
Along with most people in today’s world, I’m obsessed with my iPhone. I obtained the 1st Generation iPhone during my freshman year of college the year it came out (I still have it as an antique), and have never looked back. Currently, I use the iPhone 6 (gold) and protect it with the Naked Tough Case-Champagne Sheer Glam by Case-Mate. It is both sleek and protective, as I drop it all the time, while still showing off the beautiful color and design of the phone.
One of my absolute favorite features of the iPhone is the iCloud Calendar feature. Not only can you create a plethora of calendars and color code them (think one for appointments, one for bills/deadlines, etc.), but you can have them automatically push to all of your iOS devices and computers that you set iCloud up for the Calendar. This post will introduce you to my world of digital calendar organization using iCloud Calendars and how to share them with friends, coworkers, and/or family members.
First of all, you need to understand my love of organization and color coding (which you can by reading this post).
I started off by deciding which device would be the main portal for owning these calendars. My husband and I do not currently have a home computer or desktop, as we both use our respective laptops for work and have an iPad that we share. We set up our iPad as a separate device from our personal Apple IDs, with a separate Apple ID…this way it wouldn’t automatically sync to either of our iPhones and could act as our makeshift “home computer.” This is how I decided that the iPad would be the owner of all of our shared calendars.
After B proposed back in June of 2013, I set up a shared system to combine our digital calendars. This was very helpful with wedding planning (i.e. pushing all of our catering, venue, photography, etc. appointments I added to my iCould Calendar directly onto his iPhone and other iOS devices without thinking twice). Even after the wedding festivities ended, it has been immensely helpful in every-day life!
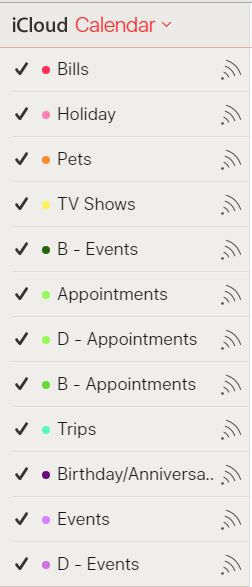 Once I decided the iPad was the owner of our calendars, I logged into www.iCloud.com with our iPad Apple ID and clicked on the Calendar app. After creating a calendar for each category mirroring my color coding system for paper calendars (as seen here), I shared each of the calendars with both mine and B’s personal Apple IDs. This is done by pressing the little satellite button by each of the calendars (see picture below) and typing in the Apple ID of your shared members. You will have to do it separately for each calendar you create, but only this once to set it up. Each person will then have to accept the invitation (either through the Calendar app on their iPhone, the online iCloud portal when logged in under their Apple ID, or in their email). Once this is complete, any person can add events to each calendar, and they will be pushed out to every iOS device connected to the Apple IDs the calendars have been shared with.
Side note – make sure all of the calendars you wish to see are checked in your Calendar app or they will not be visible.

I also created a few personal calendars (i.e. D – Appointments) that are owned by my personal Apple ID, rather than the iPad Apple ID, that I don’t share with B. This can be helpful for both parties, as he doesn’t really care to know when I’m headed to the dentist for a teeth cleaning or have a nail date with a girlfriend. You can set these up however you like to fit your personal preferences and lifestyle. Just find a system that works for you, communicate, and stick to it!
I hope these tips help you stay organized and explain the beauty of sharing your digital calendars with friends, coworkers, and/or family members. See more information on the Apple iCloud Calendar system on their website.
